

Controlling Agent Access
Access Control is where you set guardrails on your AI agents: which models each agent may call on a given provider, which tools it may use on a given connector, and whether those rules apply when the agent runs autonomously or when a specific person is driving it. By default everything is allowed; you add restrictions only for the providers and connectors you want to narrow, and Riptides enforces those inline before the request reaches the provider.
Open it from Agentic → Access Control in the sidebar.
How access is decided
Section titled “How access is decided”Three ideas drive everything on this screen.
Default allow, restrict where you add a rule. An agent with no policy, or an empty policy (no rules), has full access: it can use any model and any tool. Traffic to a provider or connector stays allowed unless the policy contains an explicit rule for that service. When you add a rule for a provider or connector, that service becomes restricted: only the models or tools you list there are permitted, and everything else on that service is blocked. Providers and connectors you never add a rule for remain unrestricted. So this is not a global denylist. It is always-allow, except where you place a restriction.
A policy targets one agent, optionally scoped to one person. For a single agent (workload identity) you can have:
- an Autonomous Operation policy: the rules that apply when the agent runs with no human driving it; and
- one policy per user: rules that apply only when that specific person is driving the agent.
Which policy applies depends on who is driving the agent, and there is no fallback between them:
| Who is driving | Policy used |
|---|---|
| No one (autonomous) | Autonomous Operation policy, if it exists |
| A user who has their own policy for this agent | That user’s policy |
| A user with no user policy for this agent | Full access (pass-through), even if Autonomous Operation is restricted |
So a restricted Autonomous Operation policy does not constrain human-driven sessions unless you also create a user policy for that person. This lets you, for example, lock the agent down when it runs unattended while giving a senior engineer a broader (or separate) set of restrictions when they drive it, but anyone without a user policy remains unrestricted.
The workloads list
Section titled “The workloads list”The dashboard lists each agent (workload identity) that has policies, with:
- Workload Identity: the agent, such as
claudeorcodex. - LLMs and Connectors: how many providers and connectors its policies restrict.
- Autonomous: whether the agent’s autonomous operation is Restricted or Not restricted (full access when running on its own).
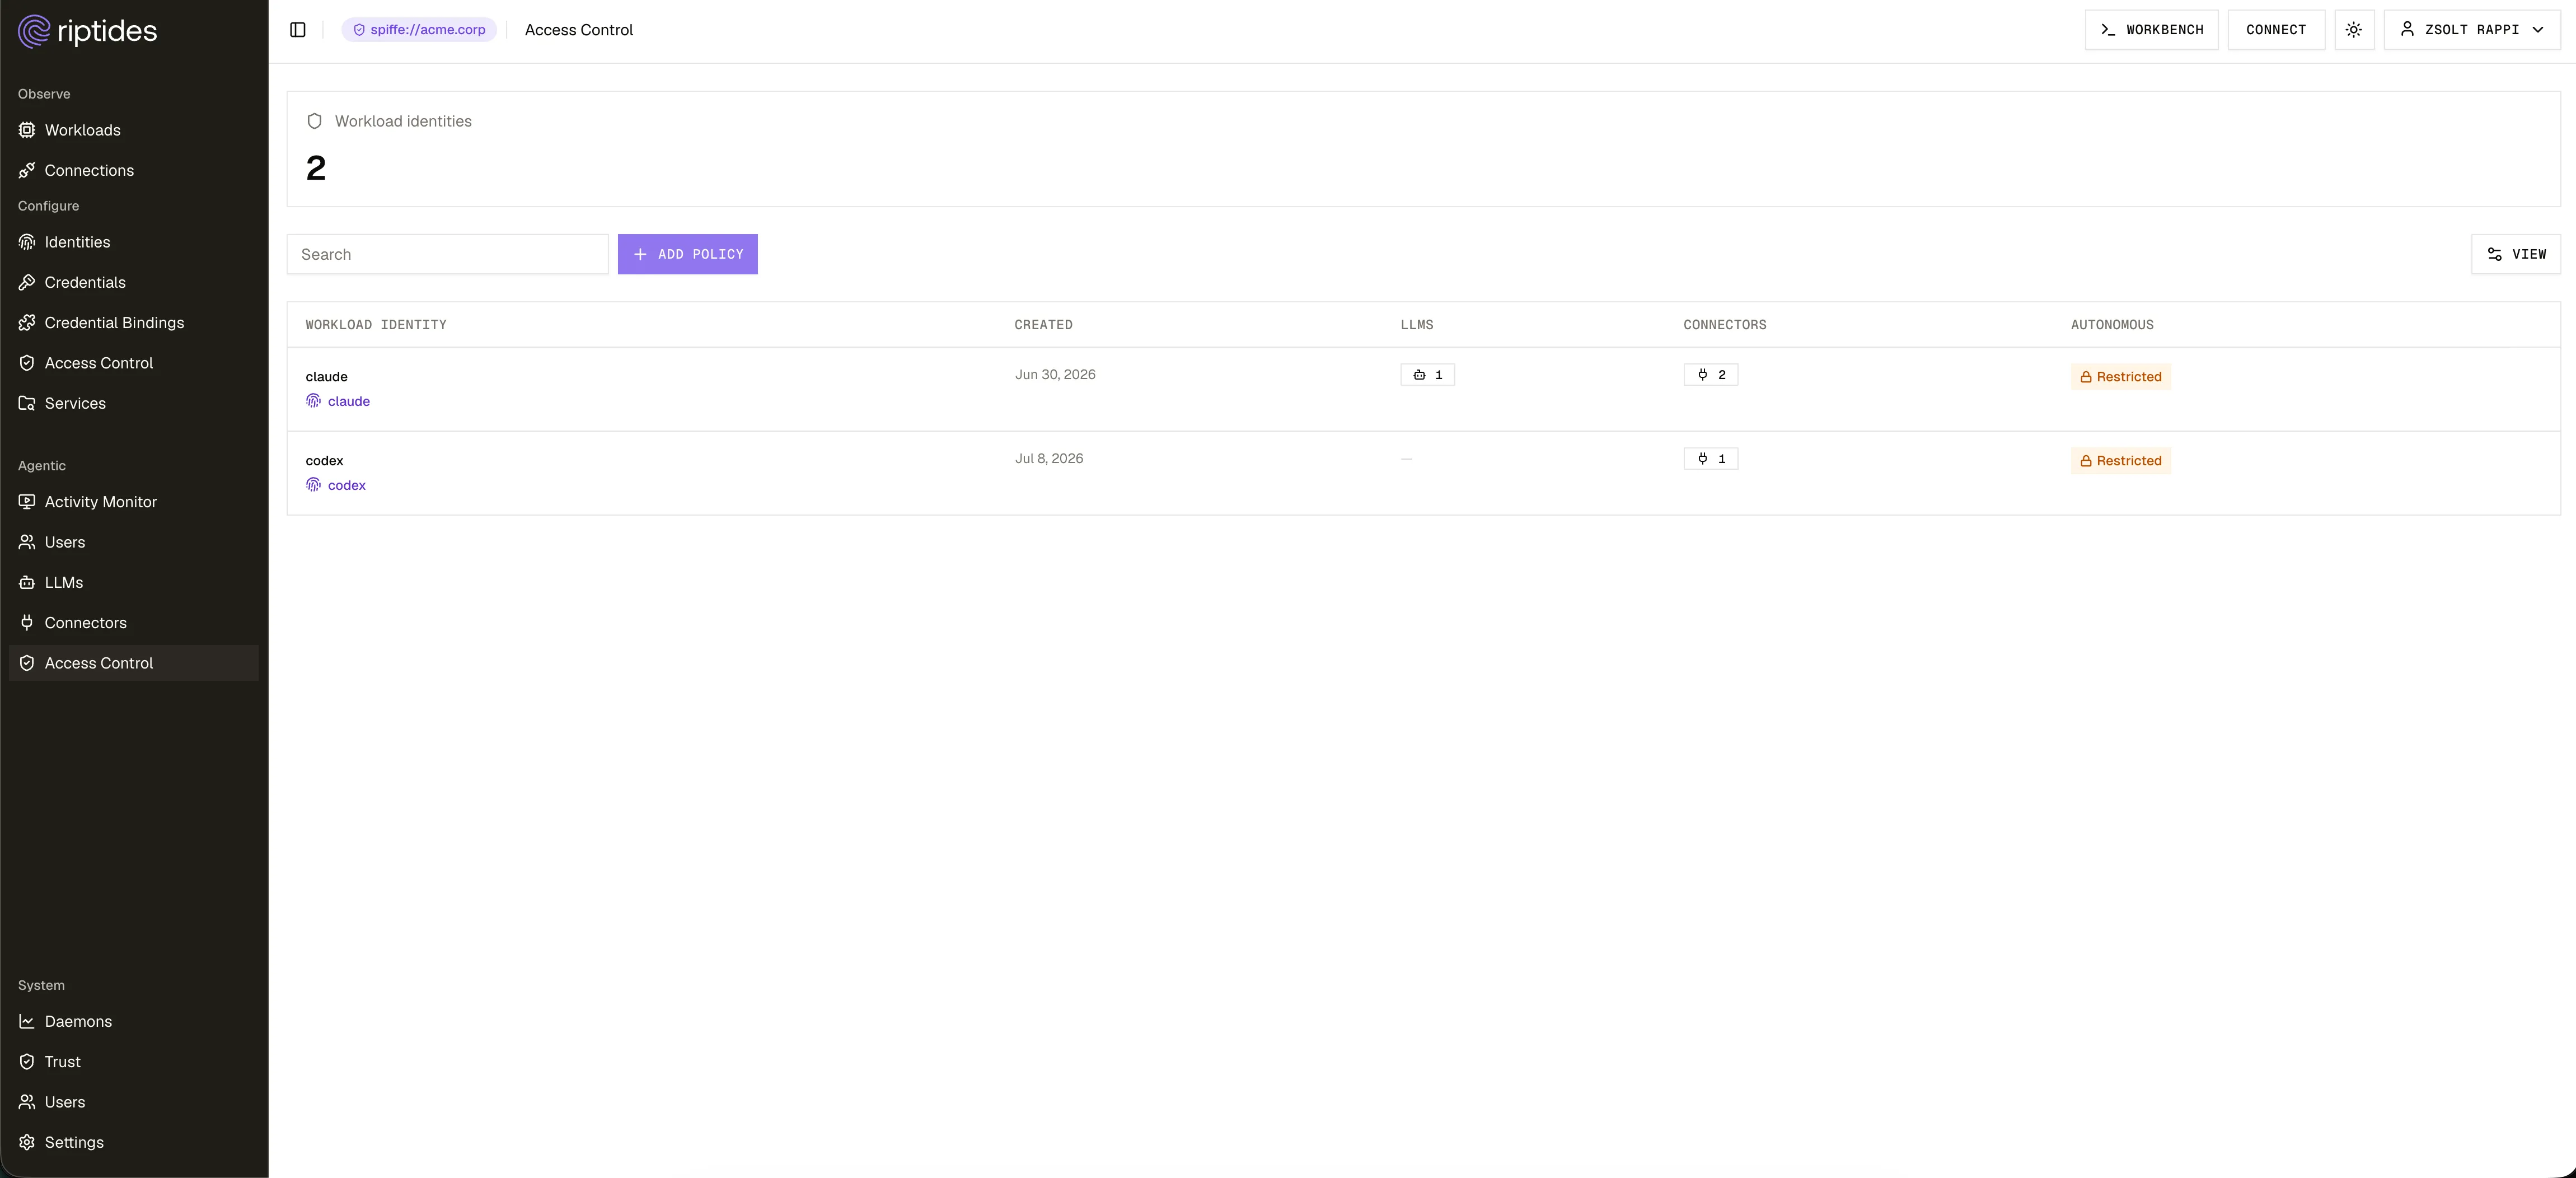
Agents are workload identities; an agent must exist as a workload identity before you can write policy for it.
Create a policy for an agent
Section titled “Create a policy for an agent”- Choose Add policy.
- Select the workload identity (the agent) you want to govern.
- Confirm. This creates an empty policy (full access), which you then narrow in the editor.
Clicking a workload row opens the policy editor for that agent.
Choose what the rules apply to
Section titled “Choose what the rules apply to”The editor first asks who the rules apply to:
- Autonomous Operation: a fixed entry at the top. Select it to restrict the agent itself.
- A specific user: select Restrict user and pick a person from your Users. Their policy then governs the agent only when they are driving it.
The footer shows how many of your users already have a restricted policy. To remove a user’s restriction, delete their policy from this list.
Restrict models and tools
Section titled “Restrict models and tools”Once you have selected Autonomous Operation or a user, the editor shows two tabs, each with a count of how many entries are restricted:
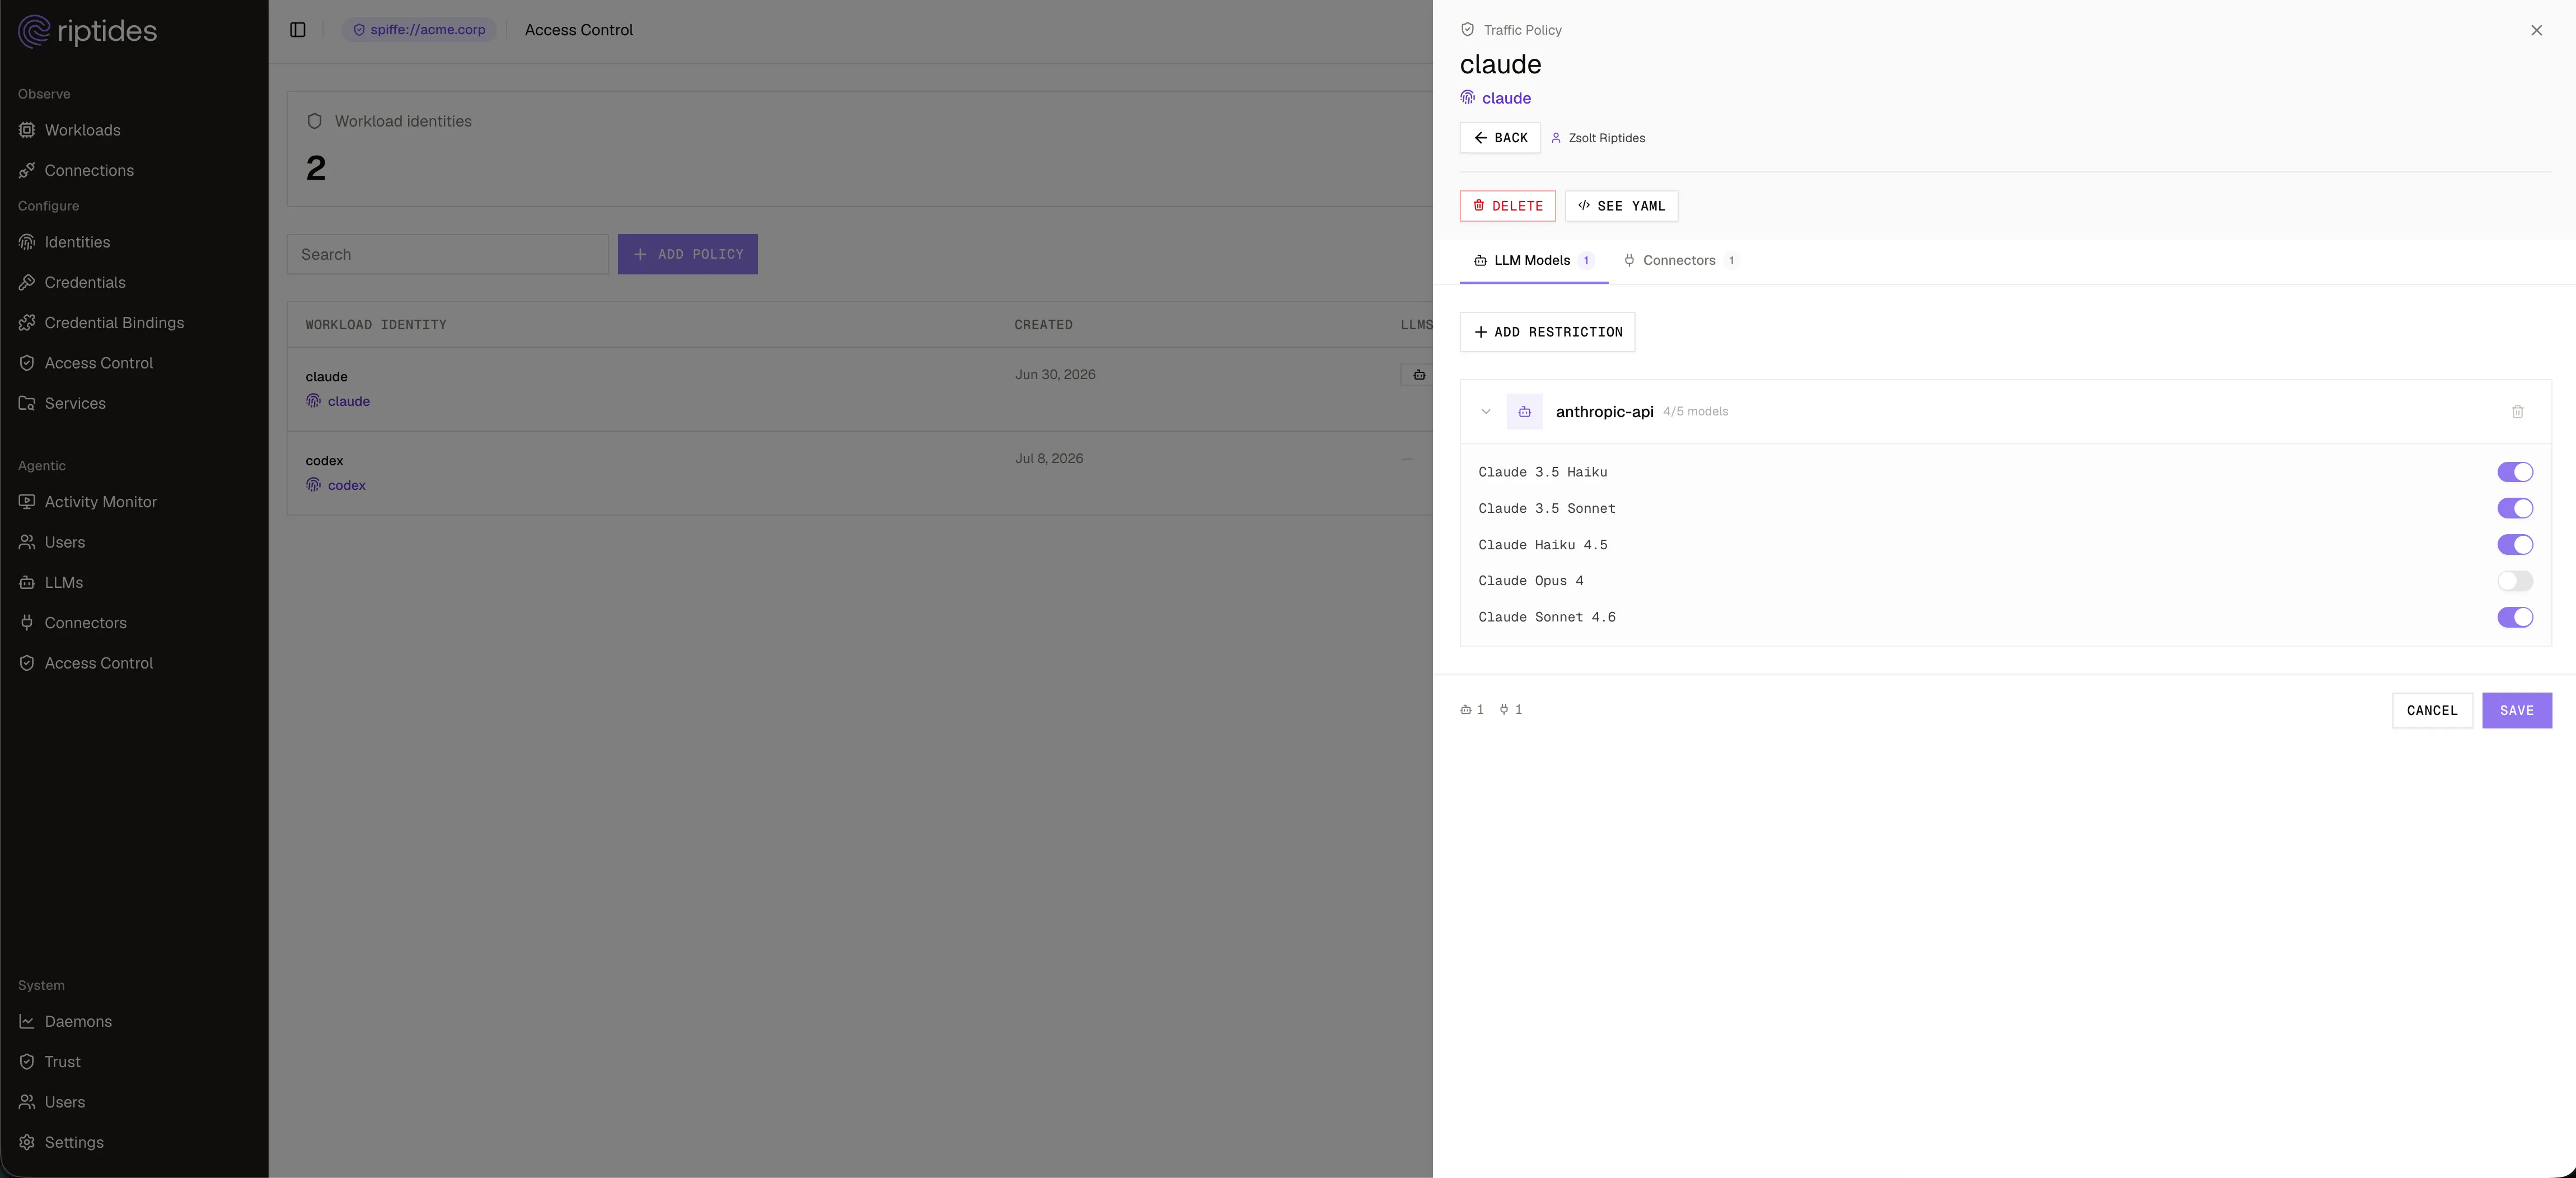
LLM Models
Section titled “LLM Models”Lists the LLM providers the policy restricts. Expand a provider to see its models, each with a toggle:
- Turn individual models off to keep only the ones you leave on for that provider.
- Leaving every model of a provider on allows the models known for that provider at save time (the list is stored explicitly).
- Removing a provider from the policy lifts the restriction, so that provider is allowed again in full. To deny models on a provider, keep the restriction and turn those models off (or leave none on).
Use Add restriction to add a provider to the policy (choosing from the providers on your LLMs screen).
Connectors
Section titled “Connectors”Lists the MCP servers the policy restricts. Expand a connector to see its tools, each with a toggle, and use Add restriction to add a connector (from your Connectors screen). The behavior mirrors LLM Models: once a connector has a restriction, only the tools you leave on are allowed for that connector (disallowed tools are blocked and hidden from the agent). Connectors you never restrict remain fully allowed.
When you are done, choose Save. The footer summarizes the counts and confirms the save.
Restrict autonomous operation
Section titled “Restrict autonomous operation”To limit what an agent can do when it runs on its own, edit its Autonomous Operation policy and Add restriction only for the providers and connectors you want to narrow when no one is driving it, then leave on only the models and tools you allow unattended. Once those restrictions are in place, the Autonomous column on the dashboard shows the agent as Restricted. Leaving the Autonomous Operation policy empty, or omitting a provider or connector from it, leaves that traffic fully allowed for autonomous runs. Remember: this policy applies only when there is no human driver; it does not cover users who lack their own policy.
Restrict to specific users
Section titled “Restrict to specific users”To govern a person when they drive the agent, add a user policy (via Restrict user) and set its restrictions. That policy takes effect only for that user. It does not inherit or fall back to Autonomous Operation: other users without their own policy keep full access, and autonomous runs use only the Autonomous Operation policy. A user is matched by the identity assigned on the Users screen.
What a block looks like
Section titled “What a block looks like”When an agent tries to use a model or tool that a restriction for that service does not permit, Riptides blocks it before the request leaves the host, and the block is recorded. In the Activity Monitor the blocked model or tool is flagged on its session, and the Blocked events count goes up. Open Access Control for that workload (and the Autonomous Operation or user entry that matches who was driving) to adjust the restriction if the block was not intended.
Manage policies as code
Section titled “Manage policies as code”Policies are standard Riptides resources (TrafficPolicy), so you can also manage them with the CLI instead of the console. This is useful for GitOps or bulk changes. A policy names the agent (workloadID), an optional user (actorID), and its LLM and connector restrictions:
apiVersion: core.riptides.io/v1alpha1kind: TrafficPolicymetadata: name: claude-autonomous namespace: riptides-systemspec: workloadID: claude # actorID omitted: this is the Autonomous Operation policy. # A user-scoped policy sets actorID to that user's identity. llmRules: - llmRef: name: anthropic-api models: - claude-haiku-4-5-20251001 connectorRules: - serverRef: name: mcp-linear tools: - search_issues - list_teamsApply it with:
riptides-cli ctl apply -f claude-autonomous.yamlAn empty spec (no rules) means full access. Each listed rule restricts only that provider or connector to the models or tools named in it; any service without a rule stays fully allowed. There is one policy per agent-and-user pair (omit actorID for Autonomous Operation).
Next steps
Section titled “Next steps”- Monitor AI activity: confirm your policy by watching sessions and blocked events.
- LLMs and Connectors: keep the models and tools your policies reference up to date.